As you may have noticed, I’ve recently moved GEEK! to a brand new VPS – which, hopefully, will massively improve the uptime and performance of the site in the long run. It’s a little too early to tell, but now most of the trial bugs are ironed out, improvements should start to be seen soon.
However, by moving my site (and all other sites I run) to a VPS, I have had to make some sacrifices. The key sacrifice on my end has been cPanel – which I’ve used ever since I started working with web servers. I love cPanel – it’s generally very reliable and controls most of the functions I would ever want. But now, as I’m slowly getting more experienced with the way web servers work, I thought it would be a good time to move on to something a little more advanced (and, as a result, cheaper). I was recommended to ISPConfig – a free and open source control panel for web servers running on Linux. And after a slow start, I seem to be getting the hang of it.
The one thing that really did get to me for a while was the poor performance of the spam filter built into ISPConfig. ISPConfig relies on SpamAssassin – which is, when configured correctly, a very powerful spam filter. But for some reason, it just wasn’t working on my installation of ISPConfig. Spam would get through and it can get seriously frustrating!
Thankfully I now have it cracked – and wanted to share the configuration I chose for ISPConfig and SpamAssassin. I think the correct settings vary from person to person – but if you want general spam filtering, this should show you how to get it.
Instructions
First of all, make sure a ‘spamfilter’ policy is active both for the email domain you’re using and for each email mailbox. I chose the Uncensored policy in my case – but different rules apply to each setting. I found Uncensored to be most effective, but simply choosing this won’t make it work properly.
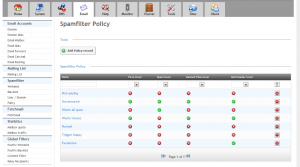
Once you’re happy that it’s supposedly on, you need to modify the rules for the policy you chose. Head to the ‘Email’ tab, and then from the left menu select ‘Policy’ under the ‘Spamfilter’ section (see screenshot that follows).
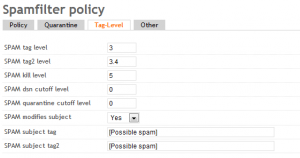
Select the policy you’re working with by simply clicking on it. Then select the ‘Tag-Level’ tab. This is where you set how sensitive SpamAssassin actually is. I found that the first three settings needed to be set as the following:
SPAM tag level: 3
SPAM tag2 level: 3.4
SPAM kill level: 5
The other settings requiring a number can be left alone. However, to make SPAM easier to separate, I’d suggest you turn on ‘SPAM modifies subject’ and choose a tag you’d like to add to SPAM emails. Here’s what the page might look like when you’re done (see screenshot that follows).
Hit ‘Save’ and it’s a good’en. If you also want to move SPAM email to a seperate Junk folder, you can do so by going to the ‘Email Mailbox’ page from the left menu, then selecting your email account and clicking the ‘Mail Filter’ tab. Simply tick the ‘Move Spam Emails to Junk directory’ checkbox and dodgy email will be moved.
Hopefully that should get you going and stop infuriating SPAM emails reaching your inbox.

