Tag Archives: guide

Guide: Make almost any printer AirPrint compatible with a Raspberry Pi in 20 minutes!

Got a printer kicking around that you wish had AirPrint? Maybe it’s one you’ve had for several years, or maybe it’s a cheaper one you recently picked up and wished it had support for your iPhone, iPad or iPod touch. In any case, if you’ve got yourself a Raspberry Pi, have 20 minutes to spare and a tiny bit of experience with SSH, you can get your printer working natively in AirPrint in a flash!

It doesn’t matter whether your printer connects via USB, Ethernet or Wi-Fi – this trick will still work. I’ll guide you through the process!

Step 1: Ensure your Raspberry Pi is up to date.

This might seem like a no-brainer, but you’ll find yourself installing out of date software if you don’t keep your Pi’s sources up to date. Open up a VNC connection with your Pi and then open Terminal. Run the following:

sudo apt-get update

then

sudo apt-get upgrade

If there are any upgrades listed, type Y and press Enter to continue installing updates. Once that’s done, you can start installing your device.

Step 2: (If you’re connecting via USB) Connect your printer with its USB cable.

If you printer normally connects via USB, now would be a good time to connect it to your Pi’s USB port. If you’re currently connecting your printer via Ethernet or Wi-Fi, run straight to step 3. Don’t panic about unplugging it from about PC that it was connected to before – it’ll be a wireless printer soon!

Connect the printer to your Pi and reboot the Pi with the following command:

sudo reboot

Once it has rebooted and you’re back at a desktop, run Terminal again and then run:

lsusb

All devices that are connected via USB should be listed at this point. If your printer doesn’t show, make sure it is turned on and functioning normally.

Step 3: Install samba and CUPS.

At this point you can start installing the backbone software that will provide the printer networking. In terminal, run the following commands:

sudo apt-get install samba

You’ll probably see apt asking to install a relatively large number of packages – don’t worry about this, just press and then Enter to continue. When that’s done, then run:

sudo apt-get install cups

Again, you’ll see apt wanting to install an assortment of packages. Carry on as before! After that, you just need to add a printing administrator so that CUPS can manage printers on the Pi. Run the following command:

sudo usermod –a –G lpadmin pi

Step 4: Add your printer. 

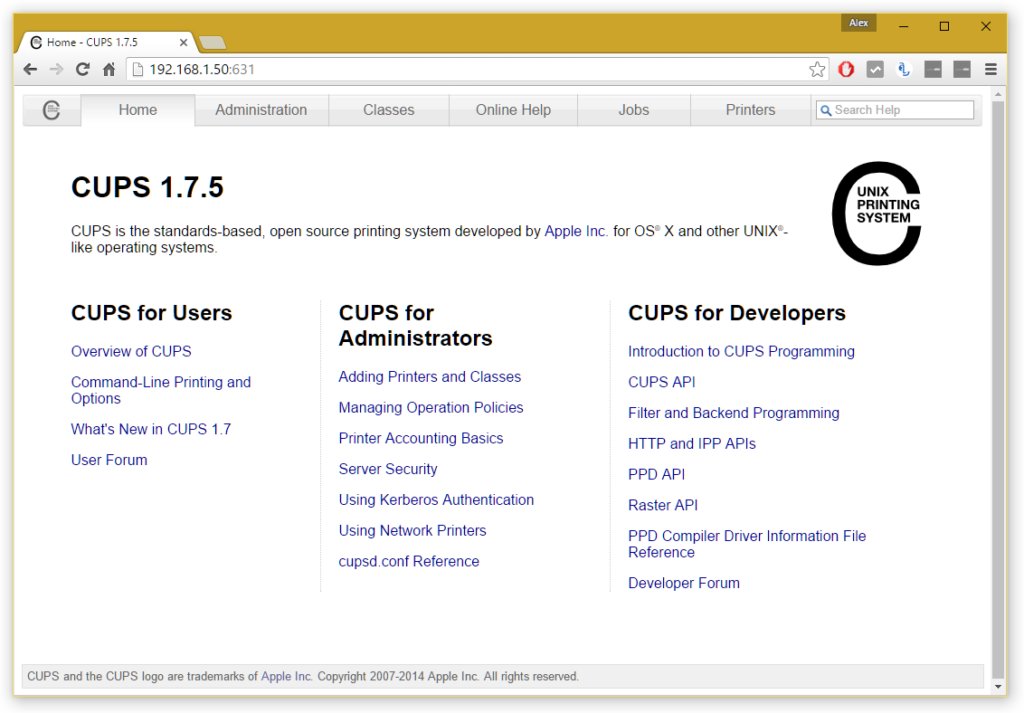
You now need to add your printer to your print server. To do this, you need to navigate to the CUPS user interface. Open up a web browser on your Pi and then navigate to 127.0.0.1:631. You should see something like this:

Home_-_CUPS_1.7.5_-_Google_Chrome_fcf924dd4bd74bcf8f5a3dacc57b826d

CUPS admin homepage

Click the Administration tab, then click Add Printer. You may be asked to switch to SSL at this point – just follow the link it tells you to go to. You’ll then be prompted to log in – just use your normal Pi credentials (username is usually Pi and the password either raspberry or whatever you might have changed it to.

Once you’re logged in, you should be given a list of currently connected printers. Find yours in the list – it should show up however it is connected (either by USB or over your network). Select it, then click Continue.

At the next step, give it a name (you can keep the default if you wish), a description (this is how your printer will be identified to your iDevice) and a location (optional). Make sure you tick Share This Printer and then click Continue.

Next, you need to select a driver. With any luck your Pi should have already identified a suitable driver – if not, you may need to scroll through the list until you find a suitable candidate. Then click Add Printer and select any default preferences you may have. Click Set Default Options when you’re done and that’s the hardest bit done!

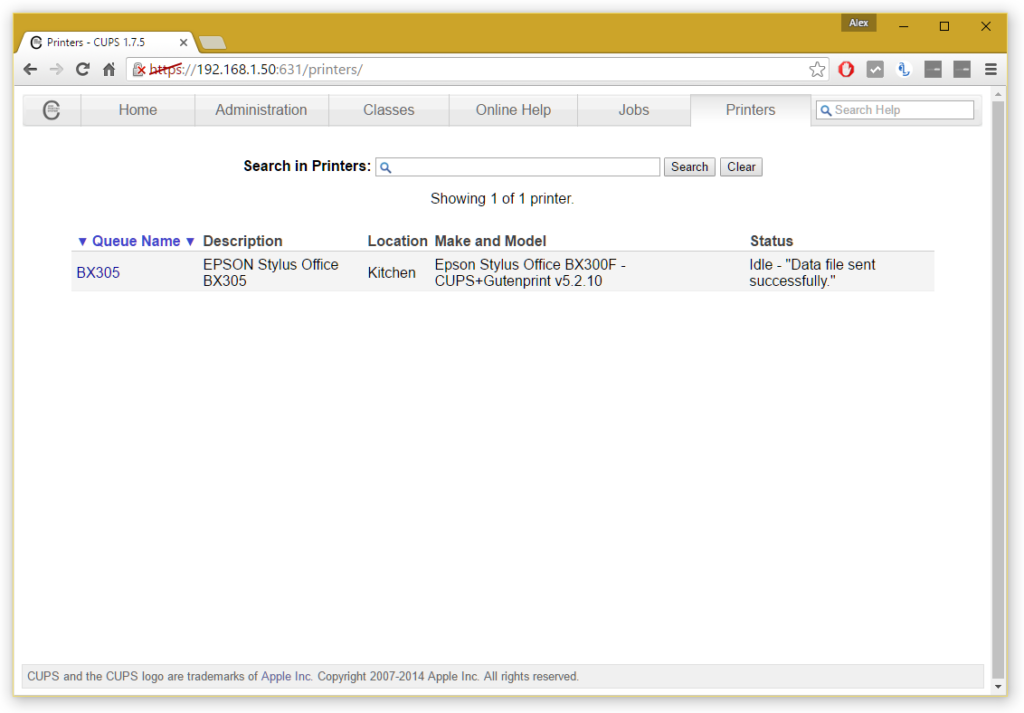
You can check the printer has been added successfully by heading over to the Printers tab and ensuring your printer is shown. To print a test page, select your printer from the list, click the Maintenance dropdown and then click Print Test Page.

Printers_-_CUPS_1.7.5_-_Google_Chrome_abe2589dedeb489098fd507ed7490519

Hopefully your printer is listed at this point!

Step 5: Fine tune a few settings.

A few settings should be fine tuned here to get best performance. Return to the Administration tab and check Share printers connected to this system. If you want to be able to manage CUPS (i.e. add new printers) remotely in future over your network, also check Allow remote administration. Then click Change Settings, the server will then reboot and you’re all good at this point.

Step 6: (Optional) Add Samba support for Windows networking

If you want to use your printer with a Windows device after this setup, you’ll need to activate Samba for Windows. To do this, run Terminal once more and run the following:

sudo nano /etc/samba/smb.conf

Scroll right to the bottom and then paste in the following:

# CUPS printing. See also the cupsaddsmb(8) manpage in the
# cupsys-client package.
printing = cups
printcap name = cups
[printers]
comment = All Printers
browseable = no
path = /var/spool/samba
printable = yes
guest ok = yes
read only = yes
create mask = 0700

# Windows clients look for this share name as a source of downloadable
# printer drivers
[print$]
comment = Printer Drivers
path = /usr/share/cups/drivers
browseable = yes
read only = yes
guest ok = no

Now, do CTRL and type in workgroup, followed by Enter to find workgroup configuration. Your workgroup is probably already correctly set it if you haven’t ever changed your workgroup before – if you have, set the correct name at workgroup =. Then change wins support = no to wins support = yes.

Then do CTTL + on your keyboard, followed by Enter, to save that configuration.

Restart samba with the following command:

sudo /etc/init.d/samba restart

Your printer will now work on a Windows network.

Step 7: (If your Raspberry Pi is connected to your network via Wi-Fi) Change a quick setting here.

Skip this step if your Pi connects to your network via an Ethernet cable. If it uses Wi-Fi, you need to turn off power saving for its Wi-Fi adapter to prevent it going to sleep and isolating AirPrint. To do this, you need to edit a file in Terminal:

sudo nano /etc/modprobe.d/8192cu.conf

Add the following at the bottom:

# No power saving
options 8192cu rtw_power_mgnt=0 rtw_enusbss=1 rtw_ips_mode=1

Then do another CTRL O, followed by Enter to save changes.

Step 8: Install Bonjour for AirPrint

Nearly there, I promise! You now need to install the AirPrint software. This is a doddle, thankfully!

Still in your Terminal, run the following command:

sudo apt-get install avahi-discover

Let that install as normal – this shouldn’t take long! Once that’s done, it would be a good idea to reboot your Pi to let all these settings sink in. In terminal, run:

sudo reboot

Step 9: Test it out! 

All should now be up and running – you’ll be pleased to know that’s the configuration done! Grab an iOS device, open up an email or Safari page, and follow the Share icon until you find a Print option. Hit Select Printer and yours should (fairly quickly) appear. If it doesn’t, don’t panic! Give it a couple more minutes and then try again – it should appear after a couple of tries the first time.

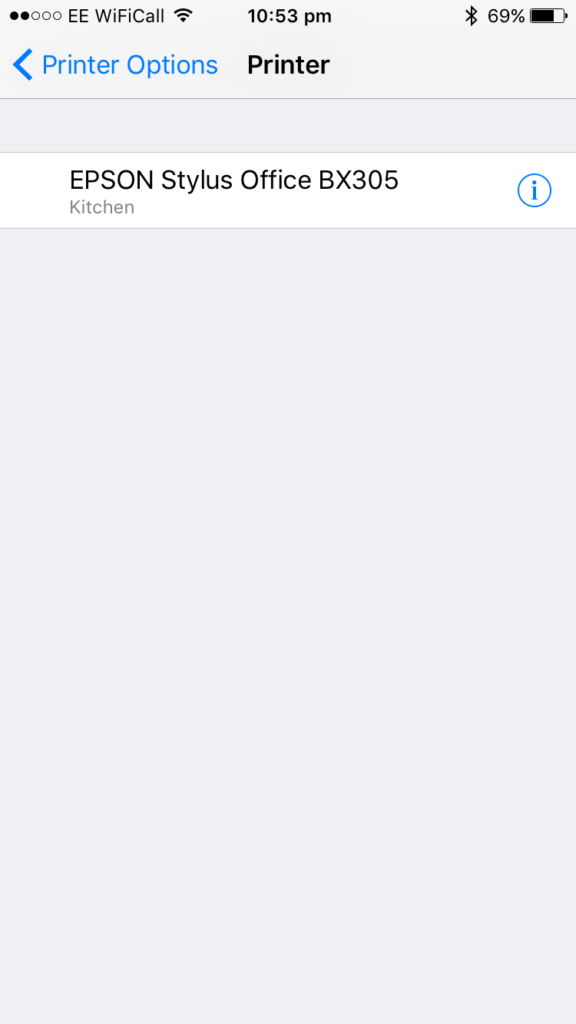
Your printer should appear at this point.

Your printer should appear at this point.

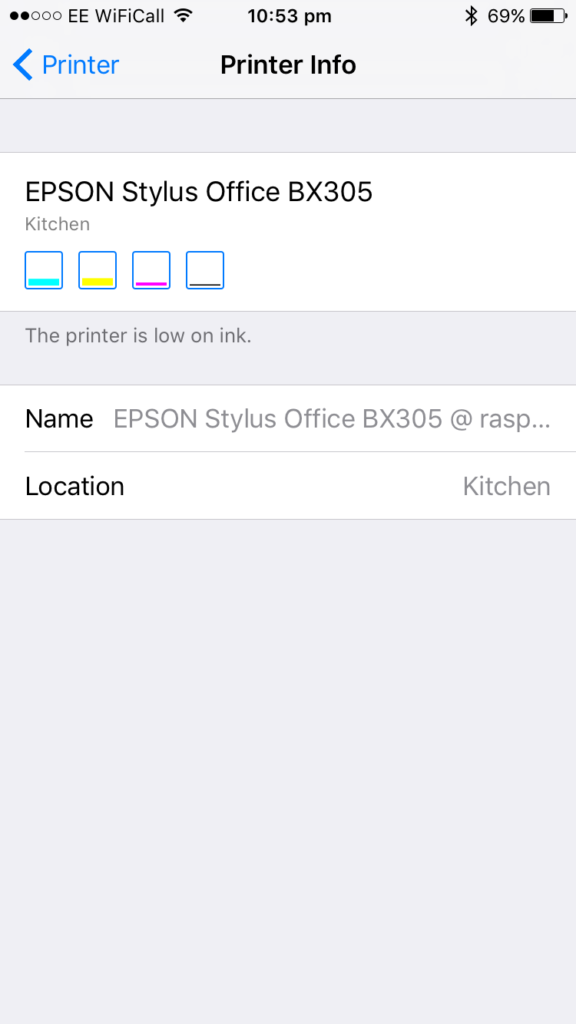
If you click the (i), you might even be able to check ink levels.

If you click the (i), you might even be able to check ink levels.

Select your printer, adjust any preferences you wish, and then click Print. Voila! It might take a few seconds to spool with your printer – this is to be expected.
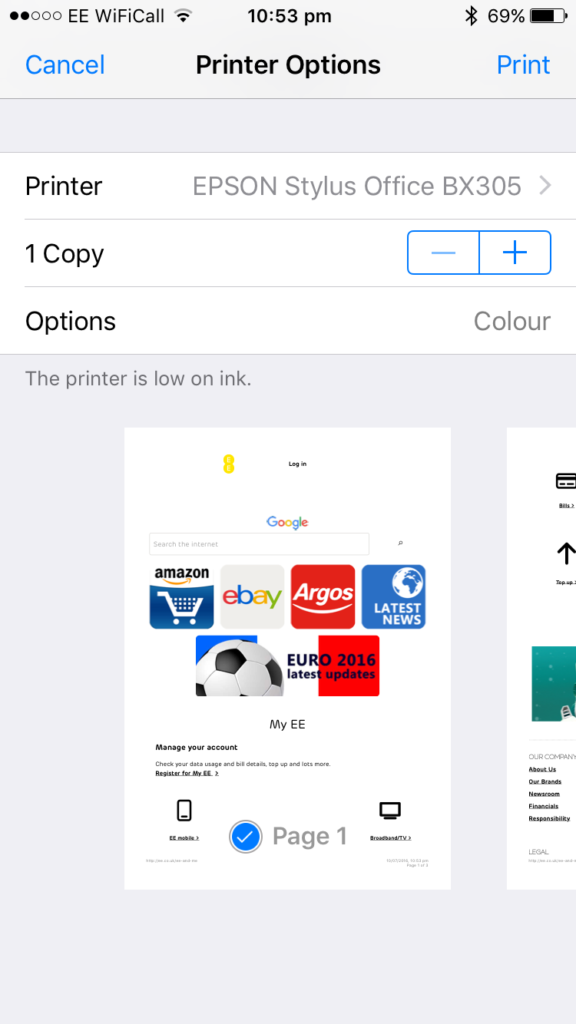
Once you've chosen the printer, adjust any preferences such as number of copies and page selection, then click Print.

Once you’ve chosen the printer, adjust any preferences such as number of copies and page selection, then click Print.

And there you have it! An AirPrint printer with a little configuration from your Pi. If you’d like to add more printers to your network, you’ll need to return to the CUPS administration panel and repeat Step 4. In any case, you should now have a printer that works over your network and on all of your favourite iOS devices, without the need for any third party app!
Linx 1010 Review – best Windows 10 tablet on the market right now?

Rating: ★★★★½

PROS:

  • Massive improvement from a design point-of-view
  • Two USB ports
  • Windows 10 works well

CONS:

  • Low resolution screen (720p)
  • Office 365 no longer included with Windows 10

Buy now from Amazon – without keyboard 

Buy now from Amazon – with keyboard

Buy now from eBay UK with keyboard

Linx have recently released their follow-up to the great value Linx 10 tablet which ran Windows 8.1, and it’s called the Linx 1010. The new version comes just in time for the new release of Windows 10 and it’s one one of the first tablets to come preloaded with the new software. So what’s new – and how does the new tablet stack up against the old one? Let’s find out!

Introduction

The Linx 1010 is designed to follow on from the success of the Linx 10. It’s designed to be great value for money while providing ample performance for most day to day tasks – such as browsing the internet, checking email and watching streaming services on the go. But the Linx 10 did this job absolutely fine as I pointed out in my last review, so what’s new – and is it worth upgrading from the previous generation?

Continue reading

Windows 8.1 Tablet Buying Guide

These days a tablet is very much the device to have if you need to get computing done out and about. They’ve actually been around in various forms for a number of years, but a massive drop in pricing over the course of 2012 and onwards has led to them becoming incredibly popular.

What people may not realise is that Windows tablets have also fallen dramatically in recent months as processor prices have fallen and Microsoft have introduced incentives to get more Windows devices on the market. In this article, we’ll take a look at some of the latest Windows 8 tablets you can buy and compare their features.

We’re going to be looking at five Windows tablets – the Linx 7, Dell Venue 8 Pro, Asus Vivotab 8, Linx 10 and the Asus Transformer Book T200.

Linx 7

So let’s kick off with what is by far the cheapest and smallest of the tablets we’re looking at today. The Linx 7 comes in around £77* on Amazon which is pretty impressive when you consider it comes with a ~£50 one year Office 365 subscription. Being the cheapest, it also has the most basic specifications – we’re looking at a quad core Intel Atom processor which clocks in at 1.33Ghz (up to 1.8Ghz turbo boost), 1GB RAM and 32GB storage. The processor you see in this device is common to a lot of Windows tablets these days – but considering its pricing it really does perform pretty well and, being quad core, it can handle opening applications pretty quickly. My main concern with this tablet is the measly 1GB RAM is provides. Let me be clear, though – 1GB will probably be plenty if you’re planning to use the device on the go for the odd bit of web browsing or email here and there. You’d be more likely to run into problems if you started running several applications at once – you’d find Windows will eat up that RAM fairly quickly and that’ll start to hamper performance. Overall, though, it’s a damn good tablet for the price and when you consider Office is included, you quickly begin to realise this tablet’s potential for being able to touch up your Word documents on the way into work.

Buy Linx 7 from Amazon

Dell Venue 8 Pro

Next up, we’ve got the Dell Venue 8 Pro. The Venue 8 Pro is probably the Windows 8 tablet I’ve heard the most about since I started looking into the market. It’s a decent all-rounder that features slightly better specs compared to the Linx 7. You’ve got a slightly bigger screen at 8 inches, a better Atom processor which will turbo boost up to 2Ghz, and (crucially) 2GB of RAM. This brings the tablet much more in line with a netbook, and that extra RAM will allow you much more freedom in terms of having multiple applicaitons open at any one time. I can’t help feeling that you’re paying for the Dell logo with this device, though – coming in at around £185* on Amazon. I’d still argue that it’s a good deal as I’d be more keen on the better specs, but if you’re on a tight budget this might not necessarily be your answer as you’ll see later in the article that there are larger tablets at a similar price.

Buy Dell Venue 8 Pro from Amazon

Asus VivoTab 8

The Asus VivoTab 8 is by far the most characteristic of the tablets we’re looking at today. The tablet features a Wacom stylus included in the box, which makes this device ideal for note-taking. It’s coming in on Amazon at around £210*, but you do have to bear in mind that it includes 64GB of storage as opposed to the 32GB storage in the Dell and Linx devices discussed in this review. That extra storage will be a big bonus if you’re looking to carry more data on the go. The tablet also comes with Windows 8.1 Professional – presumably to allow for business use, although we struggle to see any huge benefits in having this extra functionality on a tablet of this size. It doesn’t, however, include a copy of Office so you’ll have to fork out for that on top if you want it. The VivoTab 8 is an impressive device and having the stylus will definitely suit those who would normally spend time writing notes with pen and paper. Additionally, the stylus proves very helpful in navigating the traditional Windows UI which is obviously fairly small on a screen of this size. I feel that the VivoTab has a very specific market and perhaps isn’t so much an all-rounder as other devices, but for those who do need the stylus and business features of Windows, this certainly is a good contender.

Buy Asus VivoTab 8 from Amazon

Linx 10

The Linx 10 is the only device that we’ve previously reviewed here on GEEK! and still stands to be one of my favourites – certainly amongst the 10″ range at least. Currently available on Amazon for about £169*, it features a 10″ display, 2GB of RAM and 1 year of Office 365. You can read my full review here, so there’s no point in going to in huge amounts of detail here – but suffice to say it’s a very good value for money tablet that has decent build quality and can also be purchased its own keyboard case if necessary. Keyboard cases will generally only be available on 10″ devices and above – only because there just incase enough space in a 7″ or 8″ device to justify a keyboard. Performance was pretty good on this tablet and having the larger screen definitely made Windows easier to use. This device is probably the value device that I’d recommend as it does bring exceptional value for money and I’d argue you’ll find it difficult to find a 10″ device with better specs for the same price.

Buy Linx 10 from Amazon

Asus Transformer Book T200

This is the final device we’ll see in this article. I’ve included it for good measure. It is by far the most expensive device in this article coming in at around £365* on Amazon, but it does have useful extra features which makes this device much more of a laptop when docked to the included keyboard. As well as your usual specs, you’ve got a 500GB HDD on top of the 32GB drive so storage will not be an issue on this device – but the 500GB HDD is in the keyboard dock, so the device must be docked to access it. You’ve also got two USB ports (one USB 3, one USB 2) onboard the keyboard dock making connectivity considerably easier. This device is much more aimed at people who want to have a laptop and a tablet in one device. It packs a good tablet for on the go usage, plus an easy to use dock which adds extra features you’d normally see in a laptop.

Buy Asus Transformer Book T200 from Amazon

So there you have it – five very capable Windows 8.1 tablets. It’s easy to see how many different shapes and sizes are available – many of which at decent price ranges. If you’re browsing rather than buying at the moment, keep an eye out for the upcoming launch of Windows 10 (likely later this year), as it’ll be interesting to see what this will bring to both the tablet and laptop market.

How to: Protect your computer from malware in 4 simple steps

Well, since I’ve got the day off school today thanks to the vast amounts of snow across the country, I’ve decided it might be a good idea to post up a simple guide on how to protect your computer from malware and dangerous software in a few simple steps. This guide should be useful to even the most novice of computer users and will help you get started even if you don’t know your anti-virus from your firewall.

Before I start, everybody who uses a computer needs to be aware of the importance of making sure your computer is protected from malware. If you don’t keep it protected you are at risk from software that may damage your operating system or steal much of your personal details.

The biggest threat to your personal details are probably key loggers. Software is maliciously installed onto your computer via programs running in the background and then it monitors what you type with your keyboard. It then saves this data and sends it back to whoever requested it. You have to remember that this isn’t just forum passwords and computer logons – it could be your online banking details or your credit card details.

So anyway – here’s the top 4 ways to make sure your computer is safe:

  1. Make sure that you have anti-virus and firewall installed. There is plenty of free anti-virus software available – there’s no need to be spending money. I’d personally recommend Comodo Internet Security as it not only includes anti-virus and firewall in one package, but it works very well and doesn’t slow down your PC. However, other free standalone anti-virus packages include Microsoft Security Essentials, AVG Free, Avast! and more. Windows XP, Vista and 7 all comes with firewall by default, but the more security conscious should download something a bit more advanced. Comodo Internet Security comes with firewall as I said earlier, but you could also try ZoneAlarm or Outpost. When you’ve downloaded the relevant software and installed it, you’ll need to make sure that its configured correctly – it should do this automatically. If it’s set to monitor “on access” (which means it monitors traffic as it is downloaded or uploaded) and is set to occasionally do a full scan (about once a week or so) you should be fine.
  2. Make sure your chosen software is up to date. This is vital as new threats crop up daily – so you need to make sure your software isn’t going to be missing threats that came out yesterday. Your security software will probably warn you if you’re software is out of date. If it does, make sure you’re connected to the internet and tell it to update. It shouldn’t take more than five minutes but it is key to a secure key.
  3. Don’t download software you aren’t sure about. There are plenty of pop-ups and weird advertisements across the internet that may encourage you to download software you might not trust – some claim your computer is “unprotected” or “unsafe”. Totally ignore them – they are trying to encourage you to download software that could be harmful to your computer – such as key loggers. Before downloading software, try to do a quick web search to verify the safety of the software. It may be totally fine, but it’s better safe than sorry.
  4. Check the security of websites you are using. Especially consider this when you are logging onto sites that involve money. Make sure there is a padlock logo in the address bar, and make sure that the web address familiar. For example, if you are logging into PayPal, make sure the web address shows “paypal.com” and the “https://” beginning. The HTTPS means that the page is encrypted and secure. If your web browser warns you about anything to do with an “invalid” or “unsecure” certificate, tread carefully. I would suggest you try again later. If the warning persists, contact the customer support for the site you are trying to log onto, and ask them to look into the issue.

There you go – 4 simple steps that will make sure you and your computer is safe on the internet. Stick to those and you should never have a problem!

Guide: Using System Configuration to speed up your computer

Just so you know, I did originally put this up in the GEEK! Guides section on GEEK!, but I decided since I’m discontinuing that section I’ve decided I’d better republish the guides. For this guide, I’ve updated it a little and republished it here.

It happens to all of us – you’ve had your computer quite a while now and all that software you installed is beginning to take its toll. Slow start-ups, tonnes of programs nagging you on the taskbar – it happens to all of us eventually. It’s quite simple to fix, and it doesn’t always mean that you have to remove programs. Basically, you just need to use System Configuration to disable some of the programs you don’t need from running at start-up. It reduces the load on your RAM and processor meaning that startups are quicker and you aren’t bombarded with programs on the start bar.

Continue reading