Tag Archives: ipad

Guide: Make almost any printer AirPrint compatible with a Raspberry Pi in 20 minutes!

Got a printer kicking around that you wish had AirPrint? Maybe it’s one you’ve had for several years, or maybe it’s a cheaper one you recently picked up and wished it had support for your iPhone, iPad or iPod touch. In any case, if you’ve got yourself a Raspberry Pi, have 20 minutes to spare and a tiny bit of experience with SSH, you can get your printer working natively in AirPrint in a flash!

It doesn’t matter whether your printer connects via USB, Ethernet or Wi-Fi – this trick will still work. I’ll guide you through the process!

Step 1: Ensure your Raspberry Pi is up to date.

This might seem like a no-brainer, but you’ll find yourself installing out of date software if you don’t keep your Pi’s sources up to date. Open up a VNC connection with your Pi and then open Terminal. Run the following:

sudo apt-get update

then

sudo apt-get upgrade

If there are any upgrades listed, type Y and press Enter to continue installing updates. Once that’s done, you can start installing your device.

Step 2: (If you’re connecting via USB) Connect your printer with its USB cable.

If you printer normally connects via USB, now would be a good time to connect it to your Pi’s USB port. If you’re currently connecting your printer via Ethernet or Wi-Fi, run straight to step 3. Don’t panic about unplugging it from about PC that it was connected to before – it’ll be a wireless printer soon!

Connect the printer to your Pi and reboot the Pi with the following command:

sudo reboot

Once it has rebooted and you’re back at a desktop, run Terminal again and then run:

lsusb

All devices that are connected via USB should be listed at this point. If your printer doesn’t show, make sure it is turned on and functioning normally.

Step 3: Install samba and CUPS.

At this point you can start installing the backbone software that will provide the printer networking. In terminal, run the following commands:

sudo apt-get install samba

You’ll probably see apt asking to install a relatively large number of packages – don’t worry about this, just press and then Enter to continue. When that’s done, then run:

sudo apt-get install cups

Again, you’ll see apt wanting to install an assortment of packages. Carry on as before! After that, you just need to add a printing administrator so that CUPS can manage printers on the Pi. Run the following command:

sudo usermod –a –G lpadmin pi

Step 4: Add your printer. 

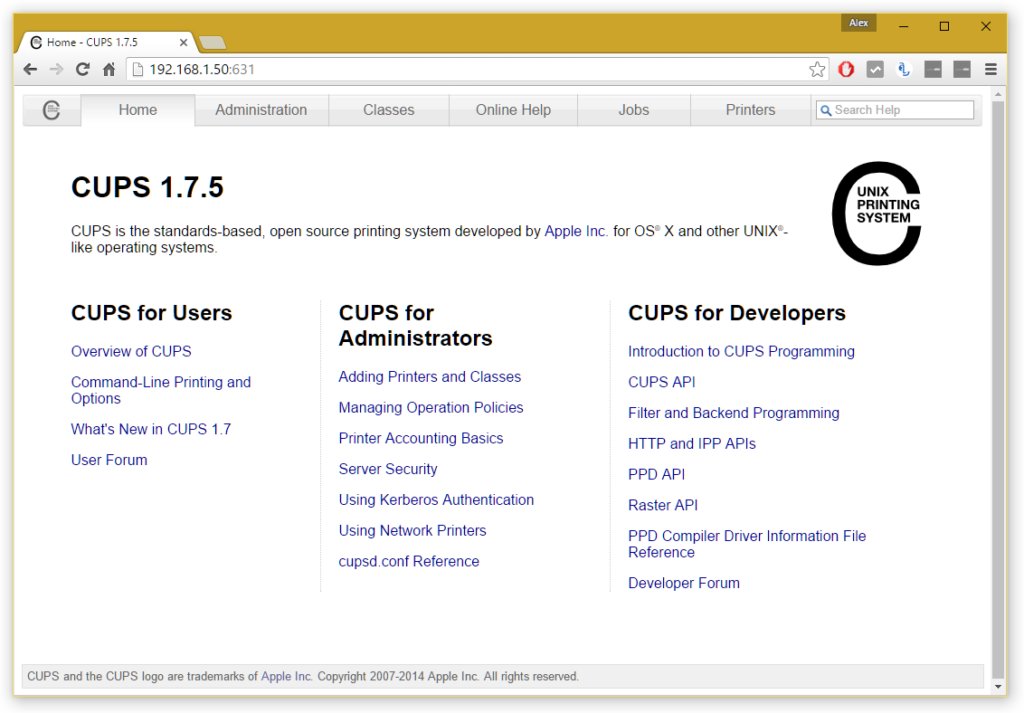
You now need to add your printer to your print server. To do this, you need to navigate to the CUPS user interface. Open up a web browser on your Pi and then navigate to 127.0.0.1:631. You should see something like this:

Home_-_CUPS_1.7.5_-_Google_Chrome_fcf924dd4bd74bcf8f5a3dacc57b826d

CUPS admin homepage

Click the Administration tab, then click Add Printer. You may be asked to switch to SSL at this point – just follow the link it tells you to go to. You’ll then be prompted to log in – just use your normal Pi credentials (username is usually Pi and the password either raspberry or whatever you might have changed it to.

Once you’re logged in, you should be given a list of currently connected printers. Find yours in the list – it should show up however it is connected (either by USB or over your network). Select it, then click Continue.

At the next step, give it a name (you can keep the default if you wish), a description (this is how your printer will be identified to your iDevice) and a location (optional). Make sure you tick Share This Printer and then click Continue.

Next, you need to select a driver. With any luck your Pi should have already identified a suitable driver – if not, you may need to scroll through the list until you find a suitable candidate. Then click Add Printer and select any default preferences you may have. Click Set Default Options when you’re done and that’s the hardest bit done!

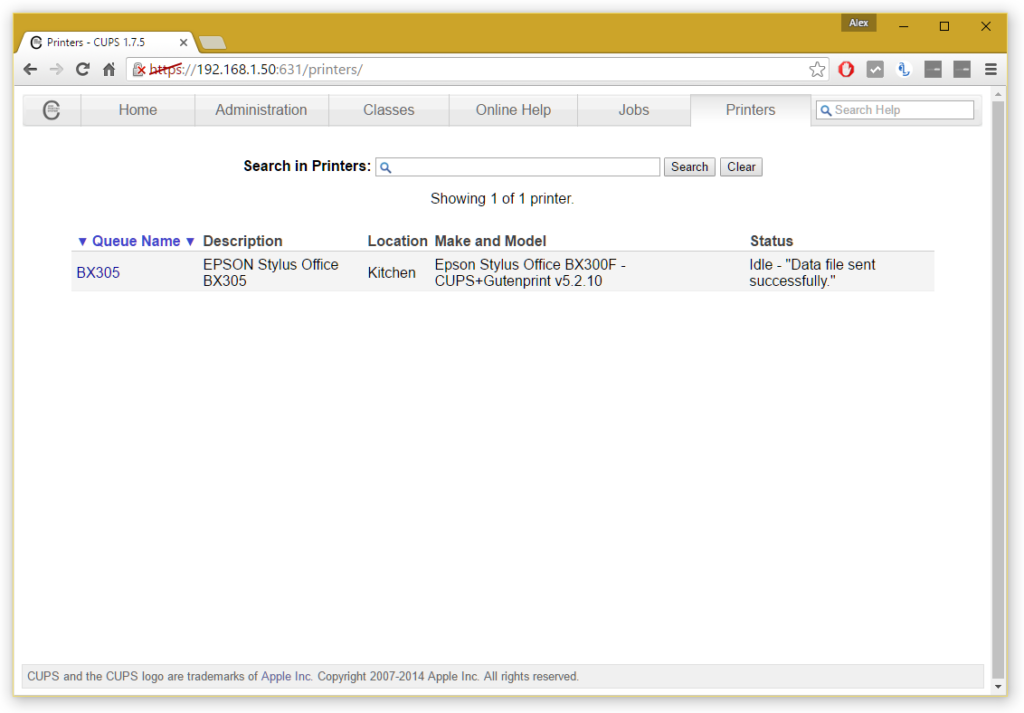
You can check the printer has been added successfully by heading over to the Printers tab and ensuring your printer is shown. To print a test page, select your printer from the list, click the Maintenance dropdown and then click Print Test Page.

Printers_-_CUPS_1.7.5_-_Google_Chrome_abe2589dedeb489098fd507ed7490519

Hopefully your printer is listed at this point!

Step 5: Fine tune a few settings.

A few settings should be fine tuned here to get best performance. Return to the Administration tab and check Share printers connected to this system. If you want to be able to manage CUPS (i.e. add new printers) remotely in future over your network, also check Allow remote administration. Then click Change Settings, the server will then reboot and you’re all good at this point.

Step 6: (Optional) Add Samba support for Windows networking

If you want to use your printer with a Windows device after this setup, you’ll need to activate Samba for Windows. To do this, run Terminal once more and run the following:

sudo nano /etc/samba/smb.conf

Scroll right to the bottom and then paste in the following:

# CUPS printing. See also the cupsaddsmb(8) manpage in the
# cupsys-client package.
printing = cups
printcap name = cups
[printers]
comment = All Printers
browseable = no
path = /var/spool/samba
printable = yes
guest ok = yes
read only = yes
create mask = 0700

# Windows clients look for this share name as a source of downloadable
# printer drivers
[print$]
comment = Printer Drivers
path = /usr/share/cups/drivers
browseable = yes
read only = yes
guest ok = no

Now, do CTRL and type in workgroup, followed by Enter to find workgroup configuration. Your workgroup is probably already correctly set it if you haven’t ever changed your workgroup before – if you have, set the correct name at workgroup =. Then change wins support = no to wins support = yes.

Then do CTTL + on your keyboard, followed by Enter, to save that configuration.

Restart samba with the following command:

sudo /etc/init.d/samba restart

Your printer will now work on a Windows network.

Step 7: (If your Raspberry Pi is connected to your network via Wi-Fi) Change a quick setting here.

Skip this step if your Pi connects to your network via an Ethernet cable. If it uses Wi-Fi, you need to turn off power saving for its Wi-Fi adapter to prevent it going to sleep and isolating AirPrint. To do this, you need to edit a file in Terminal:

sudo nano /etc/modprobe.d/8192cu.conf

Add the following at the bottom:

# No power saving
options 8192cu rtw_power_mgnt=0 rtw_enusbss=1 rtw_ips_mode=1

Then do another CTRL O, followed by Enter to save changes.

Step 8: Install Bonjour for AirPrint

Nearly there, I promise! You now need to install the AirPrint software. This is a doddle, thankfully!

Still in your Terminal, run the following command:

sudo apt-get install avahi-discover

Let that install as normal – this shouldn’t take long! Once that’s done, it would be a good idea to reboot your Pi to let all these settings sink in. In terminal, run:

sudo reboot

Step 9: Test it out! 

All should now be up and running – you’ll be pleased to know that’s the configuration done! Grab an iOS device, open up an email or Safari page, and follow the Share icon until you find a Print option. Hit Select Printer and yours should (fairly quickly) appear. If it doesn’t, don’t panic! Give it a couple more minutes and then try again – it should appear after a couple of tries the first time.

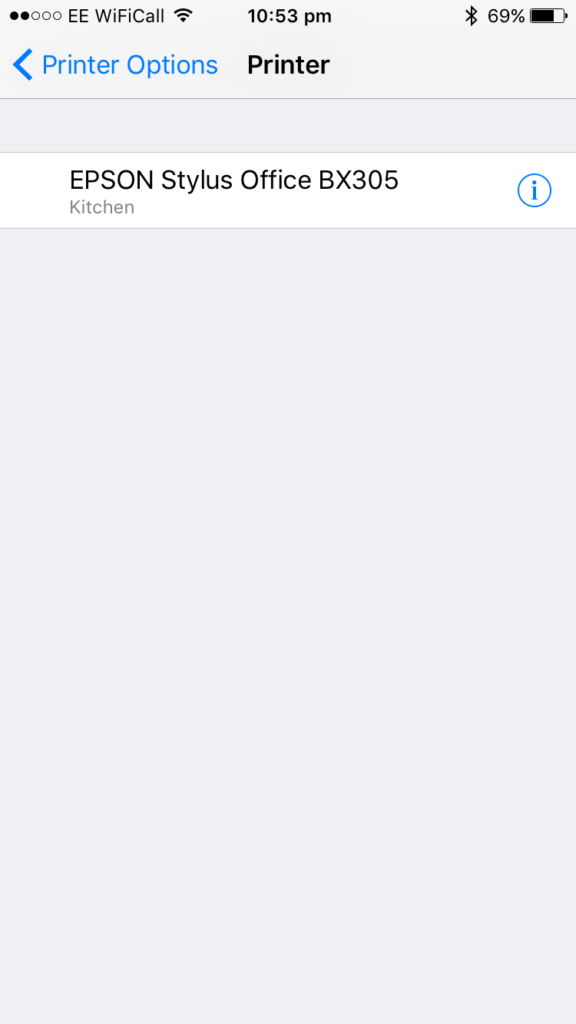
Your printer should appear at this point.

Your printer should appear at this point.

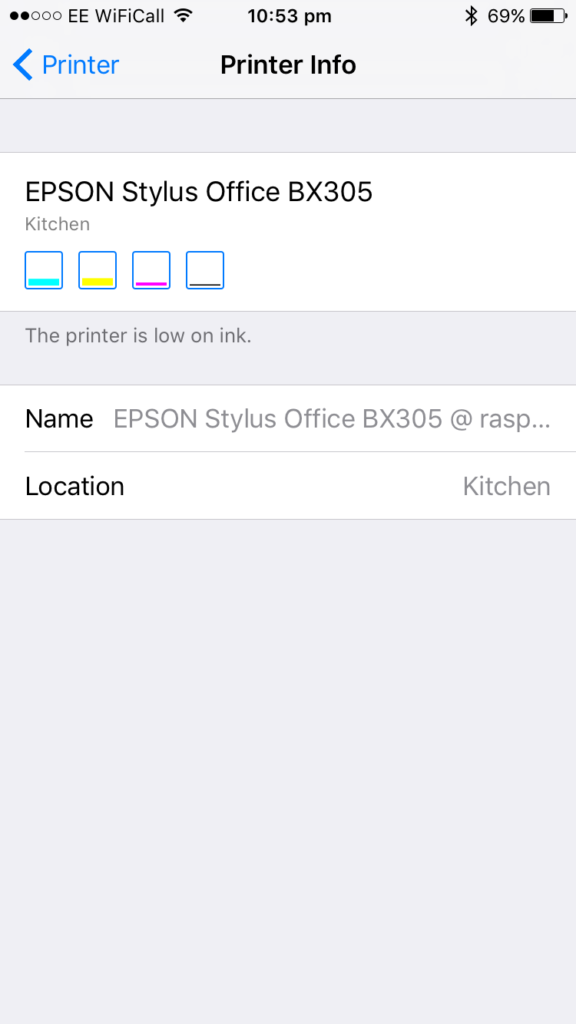
If you click the (i), you might even be able to check ink levels.

If you click the (i), you might even be able to check ink levels.

Select your printer, adjust any preferences you wish, and then click Print. Voila! It might take a few seconds to spool with your printer – this is to be expected.
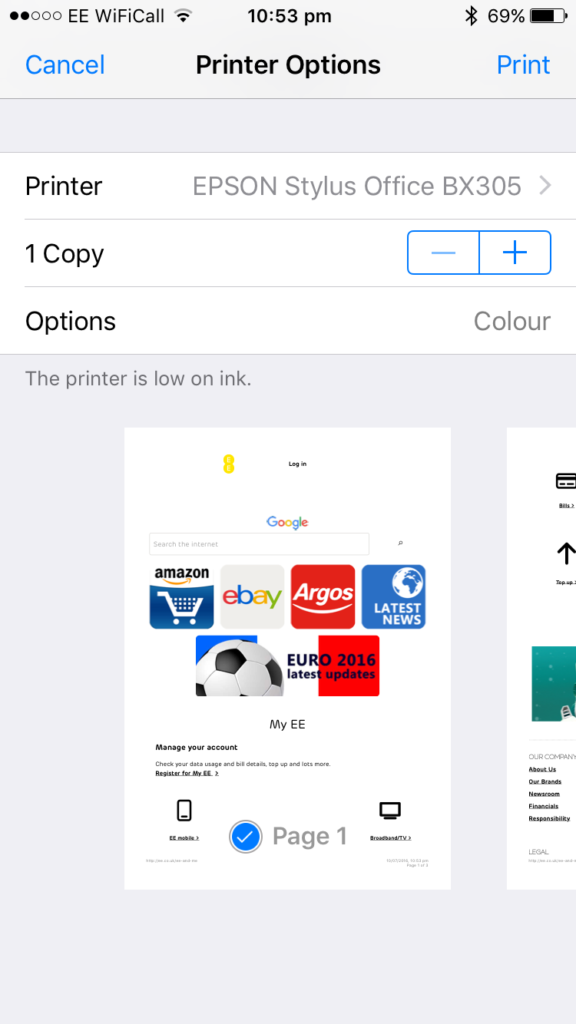
Once you've chosen the printer, adjust any preferences such as number of copies and page selection, then click Print.

Once you’ve chosen the printer, adjust any preferences such as number of copies and page selection, then click Print.

And there you have it! An AirPrint printer with a little configuration from your Pi. If you’d like to add more printers to your network, you’ll need to return to the CUPS administration panel and repeat Step 4. In any case, you should now have a printer that works over your network and on all of your favourite iOS devices, without the need for any third party app!
Charge your iPad from any PC USB port & fix “Not Charging” error

Just a very quick Christmas post. If you’ve got an iPad and you’re wondering why it won’t charge over your desktop or laptop’s USB ports – it’s because by default desktop USB ports only provide 1A of current to connected devices. Any iPad actually needs more than this to charge, hence why Apple give you a special charging plug to charge it.

However, hope is not lost. You can actually get an app for your PC which manually increases the amount of current that your PC’s USB ports provide. It’s called AI Charger and it’s by Asus. Don’t be  fooled though – it will actually work with any computer and not just computers with Asus motherboards.

All you need to do is download the app from the page, install it and give your computer a reboot. When you turn it back on, you should notice that your computer will now charge your iPad (albeit slowly).

This should actually work on any desktop or laptop. Bear in mind, though, that use of this app while using your laptop’s battery may cause excessive wear to your battery. A useful app though, nonetheless.

[ENDED] WIN! £15 to spend on the iTunes store (UK)

Yes – it’s competition time again! This time, we’re giving away a £15 iTunes gift voucher for you to spend anywhere on the iTunes store. Whether you’re looking to stock up on some new music or just want to grab some cool apps for your iPhone, iPod or iPad – this is the competition for you.

As with the last competition – all you need to do to enter is simply like GEEK! on Facebook (go to the page and click ‘Like’) and then fill in the form underneath.

This competition has now ended. Thanks to everyone who entered.

Keep your gadgets charged away from the plug – Yoobao 11200mAh external charger

Ever since I got my new phone – the HTC Sensation XE (which I love to pieces) – I’ve had the problem of stupidly poor battery life. Apparently this is an age-old Android problem where many smartphones don’t have the battery capacity to provide a decent level of charge.

With me, being a bit of a tech-head, I’ve got to the point where my phone battery will barely get me through the day. That’s because I spend a fair amount of time downloading and using apps, interacting with social networks, and generally browsing the net. Whilst none of these tasks should be particularly demanding, they do have a massive negative impact on the battery.

One way of solving this problem would be to just stop using my phone so regularly. I have done tests and found that if I’m really frugal with my phone – just using it for the odd text and call during the day – I can make the battery last all day long with some power to spare. But I don’t believe that, when I’ve committed to spending over £500 on a phone in 2 years, I should have to be limited as to what functionality I can use on the go.

So, I had to find a way of keeping the battery charged when I’m out and about. There are many ways of doing this:

  • Obviously the easiest (and cheapest) solution is to look into little chargers like car chargers – which draw current from the cigarette lighter in your car – to keep the battery going strong. Yes, if you spend hours in the car daily (which many people obviously do) then this is your simple solution – but I personally don’t. Also, bear in mind that most smartphones will simply charge via a USB cable – so if you spend most of your working life in an office, then you should simply be able to plug your device into a port on your computer and charge it.
  • You could invest in “green” portable charging solutions – such as solar chargers. Long time readers of GEEK! will know I’ve tested multiple solar chargers in the past – and in many cases they’re absolutely great. However, they do take some time to charge and if you’re not within easy access to sunlight for most of the day, you’re wasting your time.
  • Another simple option would just be to buy another battery for your phone. This is a cheap solution and will work effectively. However, the problem with this is that if you can’t get a charging “dock” for your battery, you have to constantly switch batteries in your phone to make sure each one is charged up. This is a hassle!

The usual solutions weren’t going to work for me, so I had a browse on Amazon and came across an ideal solution. It’s called the Yoobao 11200mAh External Battery Pack. It’s available on Amazon for around about £30.

You might have heard of these external battery packs before. They’re quite simple really – they have a moderately powerful battery inside them and simply provide a USB port to charge any USB device you like. However, this one is very different!

For starters, the battery is insanely powerful. The 11200mAh battery is the most powerful portable battery I’ve ever seen. If you bear in mind that my Sensation XE has a battery capacity of 1730mAh – then this means the battery pack should be able to charge my phone at least 5 or 6 times (minus some inefficiencies).

It also is a dual-port USB charger. This means it can charge two devices at the same time. Not only that, but one of the charging ports is a 2 amp charging port – which means the device is quite capable of charging more demanding devices like the iPad 2.

The device also has an emergency LED light onboard – which is powerful enough to provide illumination when most needed – and because the onboard battery is so powerful, the LED can be (theoretically) illuminated for several weeks on a single charge!

There are also 5 LED power indicators which tell you how much charge is remaining in the device.

I’ve owned my device about a week now and have to say it really is a lifesaver when my phone’s battery is running down – for the sake of £30 it really isn’t a huge price to pay. With it being able to charge more than one gadget and also being capable of charging the iPad and other demanding devices – it’s perfect for any power-hungry user.

Ok, I’ll admit it. I love the iPad 2.

Yes, I know – I am usually a bit of an apple-basher. However, I have to admit, I have found a pretty big exception.

A close relative of mine recently got her hands on an iPad 2 with Wi-Fi and I couldn’t resist giving it a play with.

Being an iPod touch 4G owner myself, I’m quite familiar with the iOS software – so that was nothing new to me really. However, there are evidently some crucial advances from the iPod touch to the iPad which make it such a joy to use.

First of all – the screen. It is, well and truly, the best touchscreen I have ever used. Full stop. The on screen keypad is just so joyful to use – I’ve never known a keypad which is so easy to type on without making mistakes.

And simple things like web browsing just seem to be so much more fun on the decent 1024×768 screen – although you do sometimes miss the retina display when you own an iPod touch or iPhone.

I’ve never been very happy with the price of Apple gadgets – but I think the iPad 2 makes the starting price of £399 quite justifiable. I still think the iPhone is stupidly overpriced – but I could just about put up with the price of the iPad.

It isn’t quite as portable as I’d like with it feeling quite heavy after a while, but for a home tablet it seems ideal.