Category Archives: Guides

Any guides that GEEK! create will slot into this category.

Stop Windows trying to dial a connection

Not many of us use dial-up internet connections any more – gone are the days where we had to rely on internet connections that had a typical download speed of 4-8KB/s. Now we have speedy broadband with it’s always-on convenience and wireless capabilities.

However, some of us do rely on mobile broadband “dongles” or mobile phone internet connections to get online when we’re out and about. These can be fantastic, but if it’s set up as a dial up connection in Windows it can prove a nightmare.

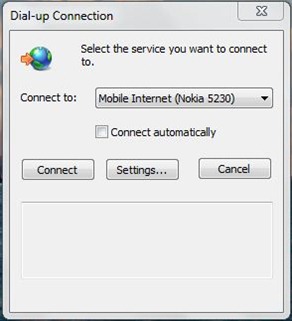
If a connection isn’t currently available, Windows is (by default) set to repeatedly ask to dial the best available connection. This has been an issue since very early versions of Windows and Microsoft have never really solved it since.

dialup

If a box similar to this one frequently appears whenever an application tries to access the internet, here’s how to solve it.

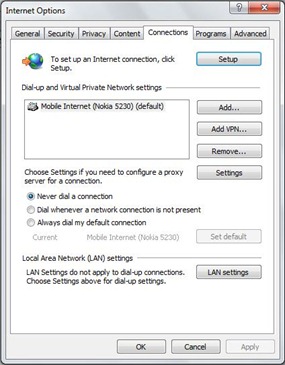
Open up Internet Explorer (the dreaded) and find Internet Options. You’ll find this under the settings button of the latest version of Internet Explorer. When you’ve got Internet Options up, click the Connections tab.

internetoptions

Under the Connections tab, look at the selection buttons above “Local Area Network (LAN) settings”. Internet Explorer probably has selected on your computer “Dial whenever a network connection is not present”. Change that to “Never dial a connection” and click OK. Close any existing connection requests (you may well get a few more before they stop) and eventually you’ll stop getting asked to connect.

From now on, you won’t be pestered and will only connect to a dial-up connection at your request.
Fix USB devices not charging on laptops/netbooks (Windows 7)

Last night, I came across a minor issue on my netbook. I want to be able to charge some of my many USB devices (such as my phone, iPod, mifi) while on the go, but I couldn’t get them to charge properly.

For example, I tried to plug in my mifi to charge it up on my long trip home – the computer recognised it fine and it charged for a few seconds – but after a little while the device reported it wasn’t charging.

I’ve discovered the problem is caused by a little power saving feature in Windows 7. It has a feature built-in that automatically reduces the power supplied to a USB device if it is not in use. Whilst this is a handy idea, it’s pretty annoying when I want to charge gadgets.

If you’re having the same issue, here’s the fix.

Go to Control Panel (make sure you’re viewing all options – by selecting Large/Small Icons in the “View by” menu), click Power Options and then choose the power plan that you’re using most (in time you might want to go through all of them). For the power plan you’ve selected click “Change Plan Settings” and then “Change advanced power settings”.

Now you’ll need to navigate to the “USB settings” plus button. Click it, then the plus button of “USB selective suspend setting” and you should see the following.

image

They’re probably set to Enabled. If they are, here’s your problem. Set it to Disabled for both On Battery and Plugged In, click Apply, and that should solve your problem.

If you can’t modify the settings because the options are all greyed out, it’s because your computer’s manufacturer is using some form of power management software that doesn’t want you to change the settings. In the case of my Samsung netbook, it was “Fast Start”. Disable whatever crud it is that’s greying out the options and you’ll be able to modify the settings. 

Get the latest firmware on your 3 Mi-Fi with loads of new features (including web admin)

If you’ve been using 3 Mi-Fi for a little (which I have), you may have come to really like it. It’s generally very fast, and is so convenient for train journeys and travelling. However, there are a few drawbacks such as no web admin and a stupid wi-fi sleep time.

I’ve found a firmware update for the device which is by a Hong Kong mobile operator. It works on the device perfectly and is in English. It adds a few new features such as:

  • Web admin – you can access all the device settings wherever you are by going to http://192.168.1.1 on the device. Very handy! It also has a battery meter and signal strength meter on this.
  • Adjustable wi-fi sleep – you no longer have to wake up the wi-fi after 10 minutes idle. With this new firmware, you can lengthen the sleep time or turn it off altogether.
  • The (M) light on the device stays on permanently, letting you know whether your data connection is active or not.

It’s a very handy update that is well worth installing. However, please read the following: You do this firmware update at your own risk. GEEK! will not be responsible for any damage to your device or it’s functionality. This is ONLY for the Huawei E5830.

Here’s how you do it:

  1. Download this firmware update. It’s 30MB and comes direct from the Japanese operator. Don’t worry, all the files are in English. I seem to find this server is pretty slow, so get a coffee while it’s downloading.
  2. When it’s done, power down and disconnect your 3 Mi-Fi device from USB. Hold down the internet access button on the device followed by the power button, together, for at least 5 seconds. You will see the signal light and battery indicator come on and they should stay on. Once you’ve got the lights, remove the battery.
  3. Replace the battery, reconnect the device to your system and then run the file you downloaded.
  4. The setup file will detect your device. It asks you to remove the SIM from the device, but I didn’t and don’t think you need to. Once you’re happy and the system is ready, start the updating.
  5. It will take anywhere from 5 to 15 minutes to install. During the install process, do not remove your device from the USB connection or turn it off – you will brick the device if you do.
  6. Once it’s finished copying, the device will reboot and the setup file will confirm the successful installation. None of your settings should have been lost and you should be able to connect right away.

Now you’re done. The “3 Wifi Manager” will still work with your device but for most settings I would now use the web admin (http://192.168.1.1 – the default user and password is admin – the device will ask you to change this when logged in).

Enjoy the new firmware.

How to: Protect your computer from malware in 4 simple steps

Well, since I’ve got the day off school today thanks to the vast amounts of snow across the country, I’ve decided it might be a good idea to post up a simple guide on how to protect your computer from malware and dangerous software in a few simple steps. This guide should be useful to even the most novice of computer users and will help you get started even if you don’t know your anti-virus from your firewall.

Before I start, everybody who uses a computer needs to be aware of the importance of making sure your computer is protected from malware. If you don’t keep it protected you are at risk from software that may damage your operating system or steal much of your personal details.

The biggest threat to your personal details are probably key loggers. Software is maliciously installed onto your computer via programs running in the background and then it monitors what you type with your keyboard. It then saves this data and sends it back to whoever requested it. You have to remember that this isn’t just forum passwords and computer logons – it could be your online banking details or your credit card details.

So anyway – here’s the top 4 ways to make sure your computer is safe:

  1. Make sure that you have anti-virus and firewall installed. There is plenty of free anti-virus software available – there’s no need to be spending money. I’d personally recommend Comodo Internet Security as it not only includes anti-virus and firewall in one package, but it works very well and doesn’t slow down your PC. However, other free standalone anti-virus packages include Microsoft Security Essentials, AVG Free, Avast! and more. Windows XP, Vista and 7 all comes with firewall by default, but the more security conscious should download something a bit more advanced. Comodo Internet Security comes with firewall as I said earlier, but you could also try ZoneAlarm or Outpost. When you’ve downloaded the relevant software and installed it, you’ll need to make sure that its configured correctly – it should do this automatically. If it’s set to monitor “on access” (which means it monitors traffic as it is downloaded or uploaded) and is set to occasionally do a full scan (about once a week or so) you should be fine.
  2. Make sure your chosen software is up to date. This is vital as new threats crop up daily – so you need to make sure your software isn’t going to be missing threats that came out yesterday. Your security software will probably warn you if you’re software is out of date. If it does, make sure you’re connected to the internet and tell it to update. It shouldn’t take more than five minutes but it is key to a secure key.
  3. Don’t download software you aren’t sure about. There are plenty of pop-ups and weird advertisements across the internet that may encourage you to download software you might not trust – some claim your computer is “unprotected” or “unsafe”. Totally ignore them – they are trying to encourage you to download software that could be harmful to your computer – such as key loggers. Before downloading software, try to do a quick web search to verify the safety of the software. It may be totally fine, but it’s better safe than sorry.
  4. Check the security of websites you are using. Especially consider this when you are logging onto sites that involve money. Make sure there is a padlock logo in the address bar, and make sure that the web address familiar. For example, if you are logging into PayPal, make sure the web address shows “paypal.com” and the “https://” beginning. The HTTPS means that the page is encrypted and secure. If your web browser warns you about anything to do with an “invalid” or “unsecure” certificate, tread carefully. I would suggest you try again later. If the warning persists, contact the customer support for the site you are trying to log onto, and ask them to look into the issue.

There you go – 4 simple steps that will make sure you and your computer is safe on the internet. Stick to those and you should never have a problem!

My new homebuilt PC – is it worth it?

Well, after many months of wanting to do it, I have finally built myself my own computer. It was great fun – for a tech nerd like me – and it also saved me a lot of money!

Here’s what I bought myself:

  • An AMD Entry Level Barebones PC kit costing £140 – that includes the case, motherboard, a dual core AMD processor and 2GB RAM
  • A 512MB Gigabyte HD4550 graphics card costing about £35
  • A 250GB hard drive costing about £25
  • A DVDRW drive costing £18
  • A 19″ LG monitor costing £92
  • A Microsoft wireless keyboard and mouse set costing £17

That was it. If my calculations are right that comes to £327 and in my opinion that is a bargain. I’ve got a really good spec PC and a nice monitor and keyboard/mouse set to go with it. Perfect!

It does go to show how much cheaper it can be to go for the build your own PC option. It is much cheaper so is perfect if you’re on a tight budget, plus it can be really good fun if you enjoy working with computers.

I wouldn’t recommend this way of getting your hands on a nice new PC if you consider yourself a novice with computers. You do have to be careful – put the wrong component in the wrong place and you’ll be adding costs for replacements. Also, make absolutely sure that you have some sort of anti-static kit for your hands. Static electricity and internal computer components do not mix!

If you like a challenge and have a few hundred pounds to spare give this a go! You might be really pleased you bothered!